Monsters in your party
This tutorial will show you how to add a monster or ambient character as a potential party member.
Tools
- Dungeon Siege SDK
- gmax
- Photoshop, GIMP, Paint Shop Pro or similar if you want a distinct texture
- A text editor (Notepad will do) for creating the template.
The Model
The first problem is importing the mesh into gmax so that you can make a few important additions. Lance's ASP import script helps, but for most meshes, the bones are twisted, and the skin weighting doesn't work. However, there's a useful trick that fixes the bone problem, and we are going to change the mesh, so the weighting must be re-done anyway.
The bone fix is relatively simple. The problem is a 90 degree twist to all the bones, but we don't know the direction. What we do know is that it is consistent, so we can twist the bone three more times to bring them back to the right orientation. So import the mesh, export it, and then re-import the result and export it again until you have done four imports. You now know that the bones are in the right position!
There is now a new version of the imports scripts amended by DdLullu that mostly cures the twisted bones problem. Some of the meshes may still import with one or more bones twisted, but it's not the major problem it was before.
At the stage, the skin is not weighted correctly, but you need to add to it before you start work on the weights. A party member can pick up armor, helemets, boots and gauntlets, and will attempt to wear them. This requires three things: a mesh that models the character wearing the armor item, polygons in that mesh designated to receive the armor texture, and subdivision of the body mesh into body, head, hands and feet, so that the appropriate part can be replaced.
If we don't want the character to wear any armor we have two choices: either the armor is worn invisibly - i.e. it shows on the paperdoll UI, but not on the character - or else we make the character drop it using skrit. In either case, the armor must be wearable, even if it will be immediately unequipped by the skrit, so we have to provide the game with "armored" versions of the mesh. There are up to nine meshes for body armor, five for gauntlets, six for boots, and 52 for helmets, depending on what version of Dungeon Siege you are playing (DS2 has more boots and gloves, and LoA has the most helmets). But the good news is that we only need one mesh to copy for all these.
Since we're not having any armor show on the character, we can apply any armor texture to a hidden piece of the mesh that is totally enclosed in the rest of the skin. Create a simple box, make its faces all material number 2, and then move it inside the body, where it won't be visible.
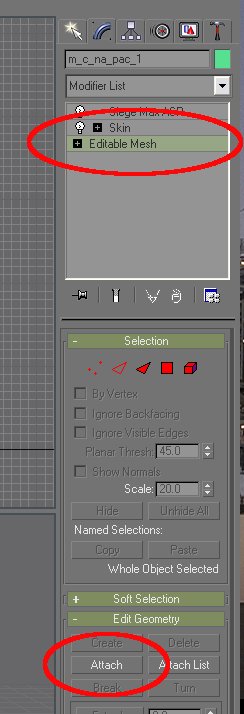
Now select the skinmesh, and edit it. Attach the box, and if you are prompted for material information, keep the material ids unchanged. You can check that the material ids are OK by selecting faces by material id in the gmax editor. The box should be material 2, and the rest of the skin material 1.
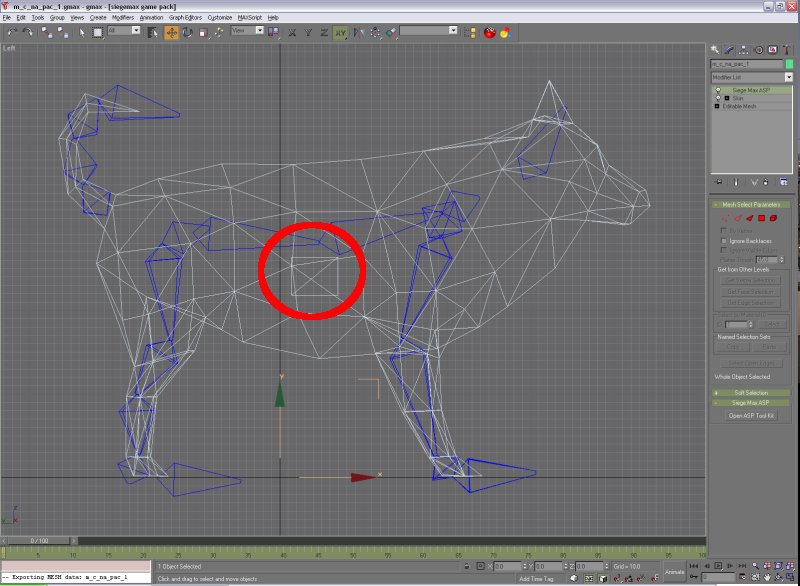
Right-click the skinmesh, and open the Aspect Tool Kit. Use "remove all faces" to ensure that head, hands and feet have no polygons. If you don't do this, parts of the model will disappear when armor is worn.

Now you can re-assign vertex weights to the model in the skin modifier. Do not forget to weight the "armor" box inside to some bone, or it will drop out of the model! Test your results by launching the animation viewer and confirming that the existing animations still work with your modified mesh. If you missed a round of import/export (or did too many) the result won't be pretty, and you have to start again!
If all is well, export the mesh. This mesh can now be copied and renamed to become every one of the required armor meshes, but see the Naming Key discussion below before you do that!
I would also recommend that the texture for the party member be distinct from the ones used for the monster versions. Otherwise, when you have a battle with those monsters, you'll have a problem deciding where to aim.
Naming key
The chances are that the monster or ambient you chose does not have any existing folders for the new meshes. You not only have to create the folders, but you have to tell the game engine their names by updating the naming key. Since multiple .nnk files are supported, you have the choice of updating the base file, or adding a new one. You should always do the latter, so that your mod does not become incompatible with others that might also replace the file.
The one problem that this causes is a potential duplication of the entry for the original monster or ambient. The options here are to leave that entry out of the extra .nnk file, or better, to change the name of the new character. Making your naming key self-complete will let you use it with other versions of the game that don't include the original character. E.g.
TREE = a_c_gbn_toto, toto, "Toto", fs0
TREE = b_c_gbn_toto, toto, "Toto"
TREE = m_c_gbn_toto, toto, "Toto"
TREE = m_c_gbn_toto_gntl, gauntlets, "Toto gloves"
TREE = m_c_gbn_toto_hlmt, helmets, "Toto helmets"
TREE = m_c_gbn_toto_boot, boots, "Toto boots"
This describes the additional folder names under /art/animations/characters/good_b_npc, /art/bitmaps/characters/good_b_npc, and /art/meshes/characters/good_b_npc where the game can find your new artwork.
Note that this requires that you copy the animations from the original creature - and rename them so that they conform to the new naming scheme. Again, copying the animations (and having a new bitmap) ensures that you can use the character even if it's not in the version of the game you're playing - such as using an LoA character in base DS1.
Skrit
If you don't want the character to wear any armor, even invisibly, then you need a skrit that makes the character drop anything they can't use. You may also need the same thing to drop weapons for which you have no animations.
There are two possible approaches to this. Either the skrit is attached to the base templates of the items, or to the character template. The former would be more appropriate for an item that has restrictions on who can use it. In our case, it makes more sense to add the skrit to the character template, as we need to drop multiple armor and weapon types, but this all applies to a single character. There are a number of existing skrits that do this, so I'm not making a new one here. Pick the one you like and negotiate with the author! The name of the skrit is added to the template as an extra block together with any parameters the skrit needs. e.g. for Monsoon's skrit used in Abstraction:
   [donotuse]
   {
       Helm = "Helm";
   }
Without a "drop" skrit, any armor item will be equipped, but because we put the box for the armor texture inside the body where it is hidden, will not display. Note that the box could have a helmet texture, or a boot texture or a glove or body armor texture on it depending on what was equipped last. Since it can't be seen, it doesn't matter. The bonuses for defense, magical effects etc, get applied even without a visible aspect.
Template
A party member should not have "specializes = hero;" in the template, as that makes them selectable as a full Player character in SP. Instead, use "specializes = npc;". You'll also have to decide how they will join the party. This could be via a conversation, like a human party member, or via a spell, like the summoned minion in LoH. This part is up to you.
Animations needed for a party member depend on their ability to use weapons. If they have none, like the dog, then only fs0 animations are needed. The mininum will be a walk/run loop, a default fight fidget, a default stance fidget, die (or become unconscious), get up, and whatever attacks your character can perform, which could include magic. Most existing monsters will have all of these except the "get up" one. You may be lucky and be able to use another animation for this, or you may have to make one.
Each one of these animations must be present in the [chore_directory] part of the template. And if you add animations to allow the character to use additional weapons, you may also need to add to the naming key entry to indicate that the new stance exists.